

Have you ever tried to slice a ripe tomato and watched the knife slide right off the skin? Or pushed down so hard on an onion that you worried the blade would slip? If so, your knife is probably dull. The good news is that you do not need to throw it away or buy a new one. You can learn how to sharpen kitchen knives at home, and it is much easier than most people think.
A sharp knife makes cooking faster, safer, and more fun. It cuts cleanly, saves your effort, and keeps your food looking neat. In this guide, you will learn how to sharpen kitchen knives step by step. We will cover the tools you need, the right angle to use, and the best methods for beginners. We will also look at how to sharpen serrated knives and ceramic knives, how often you should sharpen, and the mistakes you should avoid.
You do not need to be a chef to do this. All you need is a little time, a little patience, and the right tools. Let us get started.
Why Sharp Knives Matter in Your Kitchen
Before we talk about how to sharpen kitchen knives, let us talk about why it matters. Many people think a dull knife is only a small problem. In truth, it can cause real trouble in your kitchen.
Sharp knives are safer
This may sound strange, but a dull knife is more dangerous than a sharp one. When a blade is dull, you have to press harder to cut through food. That extra force makes it easy for the knife to slip. A slip can lead to a bad cut on your fingers or hand. A sharp knife bites into the food right away and goes where you point it. You stay in control.
Sharp knives make cooking easier
A sharp blade glides through food with very little effort. Chopping vegetables, slicing meat, and cutting herbs all feel smooth and quick. You will spend less time on prep work and feel less tired when you cook a big meal.
Sharp knives give better results
A dull knife crushes food instead of cutting it. It bruises herbs, tears the skin of tomatoes, and leaves ragged edges on meat. A sharp knife makes clean cuts. Your food looks better, cooks more evenly, and often tastes fresher, because the cut cells do not leak as much juice.
Sharp knives last longer
Knives are an investment. When you take care of them, they can last for many years, even for generations. Learning how to sharpen kitchen knives the right way keeps the blade in good shape and saves you money over time.
Sharpening vs. Honing: What Is the Difference?
Many people mix up these two words, so let us clear it up. Both are important, but they do different jobs.
Honing straightens the edge of your knife. When you use a knife, the very thin edge bends a little to one side, even if it still looks fine. Honing pushes that edge back into line. It does not remove much metal. You use a honing steel (also called a honing rod) for this job.
Sharpening removes a small amount of metal from the blade to create a brand new edge. You need to do this when honing no longer brings the knife back to life. You use a whetstone, a pull-through sharpener, or an electric sharpener for this job.
Think of it like this. Honing is like combing your hair to put it back in place. Sharpening is like getting a haircut. You do the first often, and the second only when you need it.
A good plan is to hone your knife every few times you use it, and sharpen it a few times a year.
How to Tell If Your Knife Is Dull
Before you start, check if your knife really needs sharpening. Here are three easy tests you can try at home.
The paper test
Hold a sheet of regular printer paper in one hand. Place the blade near the top edge and slice down gently. If the knife cuts the paper cleanly, with no tearing or jagged edges, it is sharp enough. If it snags, tears, or needs a lot of pressure, it is time to sharpen.
The tomato test
Place a ripe tomato on a cutting board. Rest the blade on the skin and pull it back with light pressure. A sharp knife will bite into the skin on its own. A dull knife will slide around or squash the tomato.
The light test
Hold the knife with the edge facing up under a bright light. Look along the edge. A sharp edge is so thin that it does not reflect any light. If you see a shiny line or bright spots, those are flat or rounded parts of the blade, and they mean the knife is dull.
Know Your Knife Before You Start
Not all knives are the same. Before you learn how to sharpen kitchen knives of every kind, take a moment to look at what you own.
Stainless steel and carbon steel knives
Most kitchen knives are made of stainless steel. They are easy to care for and can be sharpened with any of the methods in this guide. Carbon steel knives take a very sharp edge and are loved by many cooks, but they can rust if you leave them wet. Always dry them right after you wash them.
Straight-edge knives
Chef’s knives, paring knives, utility knives, and slicers all have smooth, straight blades. These are the easiest to sharpen, and most of this guide is about them.
Serrated knives
Bread knives and some steak knives have little teeth, like a saw. These need special tools. We will cover them later in this guide.
Ceramic knives
Ceramic blades are very hard, but they are also brittle. They stay sharp for a long time, but they need special care when the day comes to sharpen them. We will cover this later too.
Western and Japanese knives
Western-style knives, like many German or American brands, usually have a slightly wider edge angle. Japanese knives are often made of harder steel and have a thinner, sharper angle. Both can be sharpened by hand, but Japanese knives need a lighter touch and a more careful angle.
What Angle Should You Use?
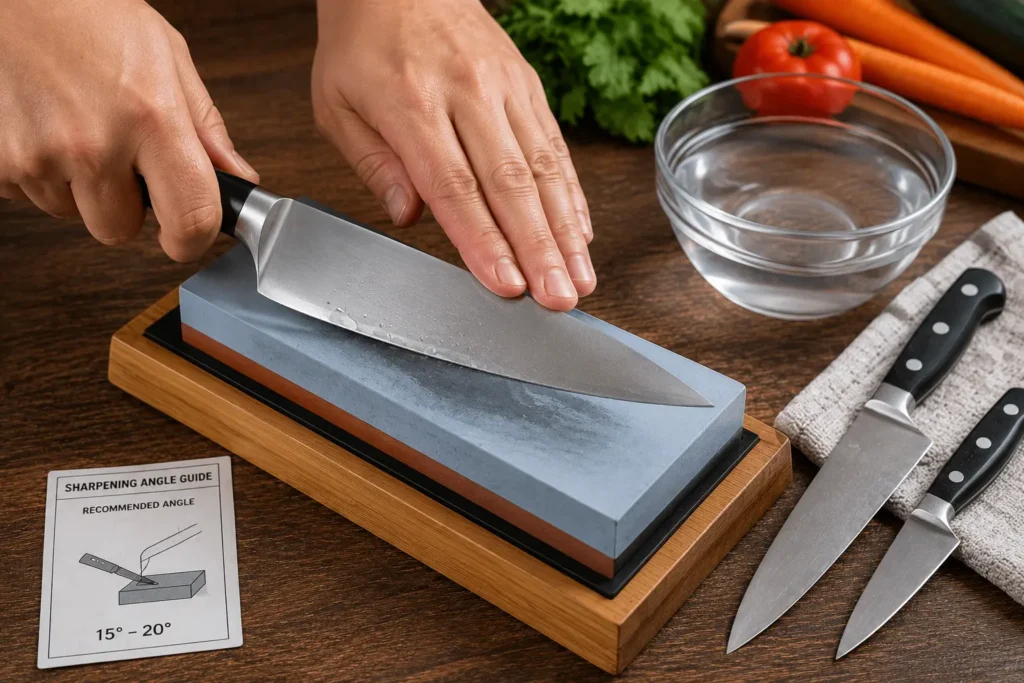
The angle is one of the most important parts of learning how to sharpen kitchen knives. The angle is how high you lift the blade off the sharpening surface.
Here is a simple guide:
- 15 degrees: Best for Japanese knives and many thin kitchen knives.
- 15 to 20 degrees: A safe range for most smooth-edged kitchen knives, including chef’s knives.
- 20 degrees: A good all-around angle for many Western knives.
- 25 degrees: Sometimes used for heavy-duty knives, like cleavers, or for knives that get very rough use.
If you are not sure, use about 15 to 20 degrees. That works well for most home knives.
How to find the angle
It can be hard to guess an angle by eye, so here is a simple trick. Place the knife flat on the stone. Raise the spine (the back, thick part of the blade) until it is about the thickness of two stacked coins above the stone. That is close to 15 to 20 degrees. You can also buy a small plastic angle guide that clips onto the knife. It helps a lot when you are just starting.
The key is to keep the same angle on every stroke. A steady angle is more important than a perfect angle.
Tools You Need to Sharpen Kitchen Knives
There are many ways to sharpen a knife. Each tool has good and bad points. Here are the most common ones.
Whetstone (sharpening stone)
A whetstone is a flat block made of abrasive material. Chefs have used it for hundreds of years. It gives you the most control and the sharpest edge, but it takes some practice. Many stones have two sides with different grits. A coarse side is used for dull knives, and a fine side is used for polishing.
Honing steel
A honing steel is a long rod with a handle. It does not really sharpen the knife. It keeps the edge straight between sharpening sessions.
Pull-through sharpener
This is a small tool with slots. You pull the knife through the slot a few times. It is cheap, fast, and easy to use. It is a great choice for beginners. The downside is that you have less control over the angle, and it can remove more metal than needed.
Electric sharpener
An electric sharpener does the work for you. You place the knife in a guide and let the motor and spinning wheels do the job. It is fast and simple, but it can wear down a blade quickly if you use it too often. Choose one with the right angle for your knives.
Other helpful items
- A damp cloth or towel to keep the stone from sliding
- A bowl of water for soaking the stone
- A cutting board
- A clean dry towel
- A leather strop (optional, for a finishing touch)
- A permanent marker (we will explain this trick soon)
Method 1: How to Sharpen Kitchen Knives with a Whetstone
A whetstone gives the best results, and once you try it a few times, it gets easier. Take your time and be patient. This is the method most chefs love.
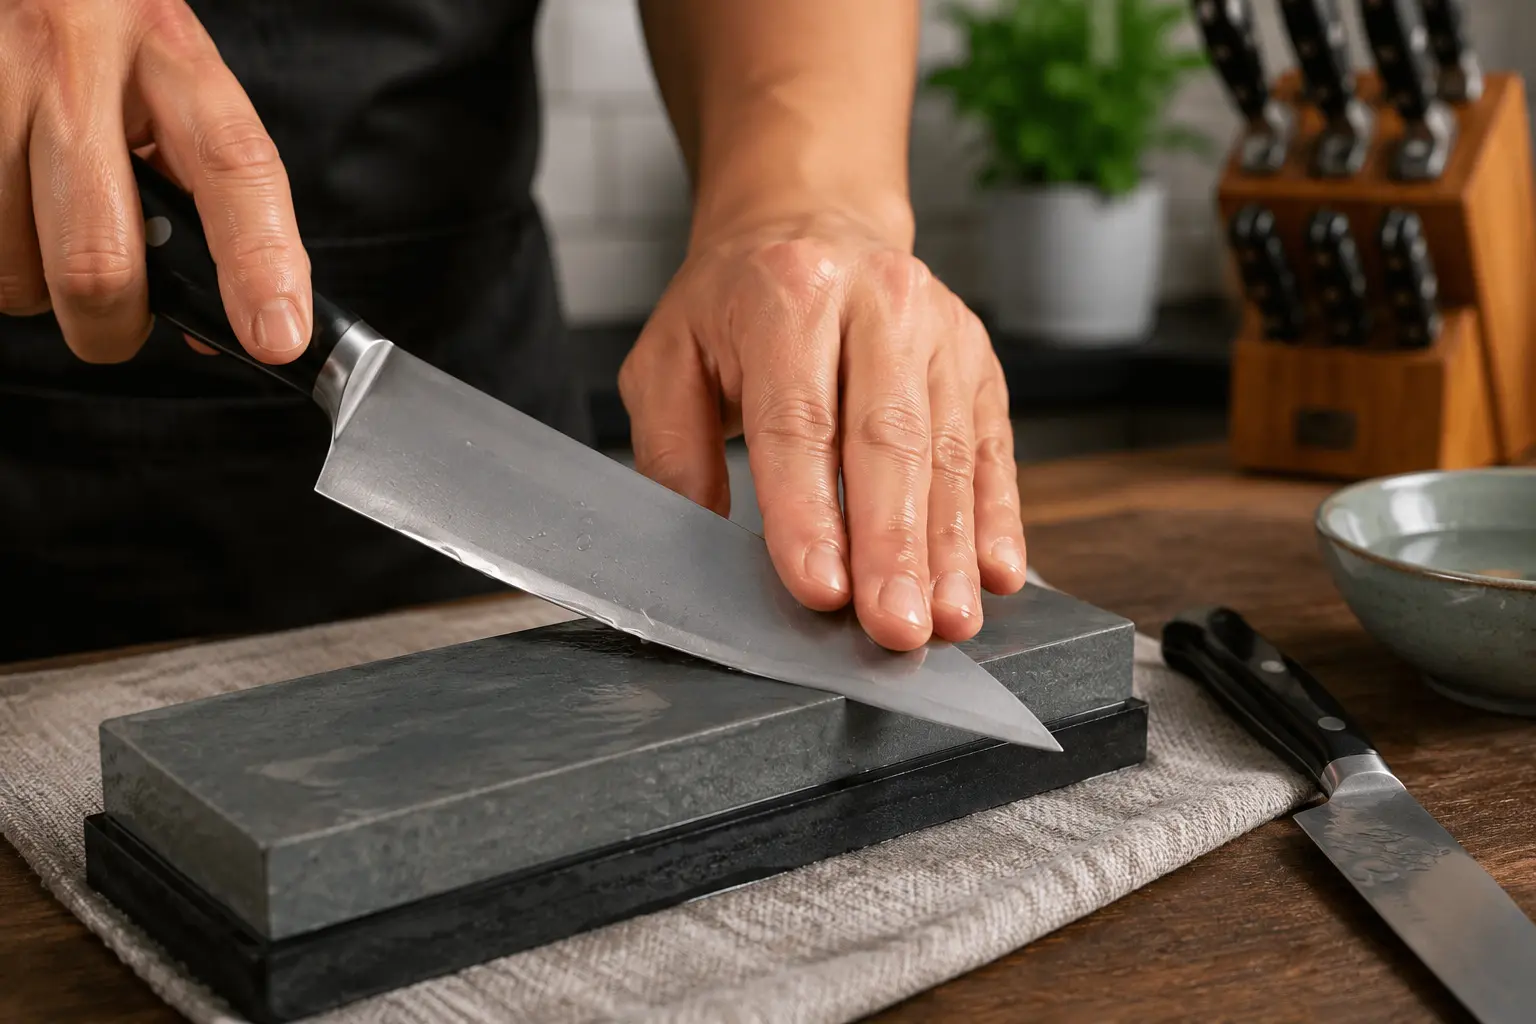
Step 1: Prepare the stone
Most whetstones need to be soaked in water before you use them. Place the stone in a bowl of water for about 10 to 15 minutes, until bubbles stop rising. Some stones do not need soaking, so read the instructions that came with yours.
Step 2: Set up a safe workspace
Place a damp towel on your counter. Set the stone on top of the towel so it does not slide. Put the coarse side up if your knife is quite dull. Use the fine side if you only want a light touch-up.
Step 3: Color the edge with a marker
Here is a handy trick for beginners. Use a permanent marker to color the edge of the blade on both sides. As you sharpen, the ink will rub away where the stone touches the metal. If the ink disappears evenly along the edge, your angle is right. If it only rubs away in some places, adjust your angle.
Step 4: Find your angle
Hold the knife handle with your dominant hand. Place the blade on the stone with the edge facing away from you. Lift the spine to about 15 to 20 degrees. Place two or three fingers of your other hand flat on the blade, near the edge, so you can guide it with even pressure. Keep your fingers away from the sharp edge.
Step 5: Push the blade across the stone
Using light, steady pressure, push the knife forward and across the stone, like you are trying to slice a thin layer off the top of the stone. Start at the heel (the part near the handle) and move toward the tip. Let the blade travel the whole length of the stone in one smooth move. Do not press too hard. Let the stone do the work.
Step 6: Repeat on one side
Repeat this stroke about 10 to 15 times on the same side. Keep your angle the same each time. Add a little water to the stone if it starts to dry out.
Step 7: Feel for the burr
A burr is a tiny rough ridge of metal that forms on the opposite side of the blade when you have sharpened enough. Gently run your thumb across the edge, from the spine toward the edge (never along the edge). If you feel a slight rough lip, you have made a burr. That is a good sign.
Step 8: Flip the knife and repeat
Turn the knife over and sharpen the other side with the same number of strokes. Keep the same angle. Keep the work even on both sides.
Step 9: Move to the fine grit
Flip the stone to the fine side. Repeat the process with lighter pressure, using fewer strokes. This step polishes the edge and removes the rough burr.
Step 10: Finish and clean
Wash the knife with warm, soapy water and dry it right away. Test it on a sheet of paper. If it cuts cleanly, you did it! If not, go back to the stone for a few more strokes.
Tip: If you want an even better edge, finish with a few light strokes on a leather strop. This removes tiny leftover burrs and makes the blade extra smooth.
Method 2: How to Hone a Knife with a Honing Steel
A honing steel is the easiest way to keep your knife in good shape between sharpening sessions. Many cooks use it before every big cooking job. It takes less than a minute.
Step 1: Hold the steel steady
Hold the steel straight up with the tip resting on a cutting board or counter. Place a folded towel under it so it does not slip. Keep your hand above the guard, away from the blade.
Step 2: Set the angle
Place the heel of the blade (the part near the handle) against the top of the steel. Tilt the blade to about 15 to 20 degrees, the same angle you would use on a stone.
Step 3: Slide down
With light pressure, slide the blade down the steel, pulling it toward you and moving from the heel to the tip. The entire edge should touch the steel in one smooth sweep.
Step 4: Switch sides
Repeat on the other side of the steel. Alternate left and right sides for about 5 to 10 strokes on each side.
Step 5: Wipe and test
Wipe the blade clean with a damp cloth. Test it on a tomato or a sheet of paper.
Remember, honing does not remove much metal. If your knife is truly dull, honing alone will not fix it. At that point, you need to sharpen.
Method 3: How to Sharpen Kitchen Knives with a Pull-Through Sharpener
If you are a beginner or a busy cook, a pull-through sharpener is a simple tool. It is small, cheap, and fits in a drawer. Many people start here.
Step 1: Place the sharpener on a flat surface
Put the sharpener on a steady counter or table. Many have a non-slip base. Hold the handle firmly with one hand.
Step 2: Choose the right slot
Most pull-through sharpeners have two slots. The first slot (coarse) shapes a dull blade. The second slot (fine) polishes the edge. Start with the coarse slot if your knife is very dull. Use only the fine slot if you just need a light touch-up.
Step 3: Pull the knife through
Place the heel of the blade into the slot. Pull it straight toward you in one smooth motion, all the way to the tip. Use only light pressure. Do not force it.
Step 4: Repeat a few times
Pull the knife through about 3 to 5 times in the coarse slot. Then move to the fine slot and pull it through 2 or 3 times.
Step 5: Clean and test
Wipe the blade clean and do the paper test. If it cuts cleanly, you are done.
Good to know: Pull-through sharpeners are quick, but they remove more metal than a whetstone does. If you own expensive knives, use this method only now and then.
Method 4: How to Sharpen Kitchen Knives with an Electric Sharpener
An electric sharpener is the fastest way to bring back a dull edge. It is great for people who do not want to spend time on practice.
Step 1: Read the manual
Every electric sharpener works a little differently. Read the instructions so you know which slot to use for which stage.
Step 2: Start with the coarse stage
Turn the machine on. Place the blade in the first slot, with the heel near the handle. Slowly pull the blade through, letting the weight of the knife do the work. Do not push down.
Step 3: Alternate sides
Most machines have a left and right guide. Pull the knife through one side, then the other. Make about 2 to 3 passes per side.
Step 4: Move to the fine stage
Use the finer slot to polish the edge. Make 1 or 2 passes on each side.
Step 5: Wash and dry
Sharpening leaves tiny metal bits on the blade. Wash the knife and dry it well.
Be careful: Electric sharpeners can wear a blade down quickly. Use one only when your knife really needs it, and not every week. Also, check that the angle on the machine matches the angle of your knife.
Method 5: How to Sharpen a Knife Without a Sharpener
What if you do not own any sharpening tools? Do not worry. You can still bring a bit of life back into a dull knife with a household item.
Using a ceramic mug
Turn a regular ceramic mug upside down. Look for the rough, unglazed ring on the bottom edge of the mug. This ring works like a very small sharpening stone.
- Hold the mug steady on a table or counter.
- Place the blade against the rough ring at about a 15 to 20 degree angle.
- Slide the blade along the ring, moving from the heel to the tip, with light pressure.
- Repeat several times, then flip the knife over and do the same on the other side.
- Wipe the blade and test it.
This trick works best on small kitchen knives and is only a short-term fix. It will not give you a perfect edge. If you can, get a real sharpener as soon as possible.
Using the back of another knife
Some people use the spine of one knife to hone another. This is not very reliable and can damage your blades, so we do not recommend it as a regular habit.
How to Sharpen a Serrated Knife
Can you sharpen a serrated knife? Yes, you can! But you need to use a different method. A regular stone or a pull-through sharpener will not work, because the blade has a row of small teeth.
Here is what to do:
- Get a tapered sharpening rod (a small round rod that fits into the curves of the teeth). Many are sold as serrated knife sharpeners.
- Find the beveled side of the blade. Serrated knives are usually sharpened on only one side.
- Place the rod in the first curve of the teeth, matching the angle of the bevel.
- Move the rod back and forth a few times in each curve.
- Go over each tooth, one at a time, until you have sharpened them all.
- Flip the knife over and gently run the rod or a fine file along the flat side to remove the burr.
Serrated knives stay sharp for a long time, so you will not need to do this often. A bread knife may last a year or more between sharpenings.
How to Sharpen a Ceramic Knife
Ceramic knives are very hard and keep their edge for a long time, but they are also brittle. A drop on a tile floor can chip the blade. Because ceramic is so hard, you cannot use a regular steel stone on it.
Here are your options:
- Use a diamond sharpener: Diamond is harder than ceramic, so a diamond stone or diamond rod can sharpen it.
- Use a special ceramic knife sharpener: Some brands make electric or manual sharpeners made for ceramic blades.
- Send it to a pro or the maker: Many companies offer sharpening services for ceramic knives. This is often the safest choice.
When you work on a ceramic knife, use very light pressure. Heavy pressure can chip the blade.
How Often Should You Sharpen Your Kitchen Knives?
The answer depends on how much you cook and how you care for your knives. Here is a simple rule of thumb.
- If you cook every day: Sharpen your knives about every 3 months, and hone them every week or so.
- If you cook a few times a week: Sharpen about every 4 to 6 months, and hone now and then.
- If you cook only a little: Sharpen about once or twice a year.
The best way to know is to use the paper test and the tomato test. If your knife struggles, it is time. Do not wait until the blade is very dull, because a very dull knife takes much longer to fix.
Common Mistakes to Avoid When Sharpening Knives
Even when you know how to sharpen kitchen knives, a few small mistakes can spoil your work. Here are the most common ones, and how to avoid them.
1. Changing the angle while you work
If your angle wobbles, the edge will be uneven. Take your time and keep your wrist steady. The marker trick helps a lot.
2. Pressing too hard
More pressure does not mean a sharper knife. Heavy pressure can scratch the blade or cause you to slip. Use light, even pressure and let the stone work.
3. Skipping the fine grit
The coarse side shapes the edge, but the fine side makes it sharp and smooth. Do not skip it.
4. Sharpening too often
Every time you sharpen, you remove a little metal. Do it only when you need to, and use a honing steel in between.
5. Using the wrong tool
A stone does not work on serrated knives, and a steel stone does not work on ceramic knives. Match the tool to the knife.
6. Not drying the knife
Water can lead to rust, especially on carbon steel. Always dry your blade right after you wash it.
7. Washing knives in the dishwasher
The hot water, strong soap, and banging around can dull the edge and harm the handle. Wash your good knives by hand.
8. Rushing
Sharpening is a slow, calm job. If you rush, you are more likely to make mistakes or get hurt.
Safety Tips for Sharpening Knives
A sharp blade can hurt you if you are not careful. Keep these safety tips in mind.
- Work on a stable surface: Use a damp towel under your stone so it does not slip.
- Keep your fingers away from the edge: Always place your fingers on the flat of the blade, never near the cutting edge.
- Go slowly: Do not rush your strokes.
- Never test the edge with your finger along the blade: Instead, use the paper test or run your thumb across (not along) the edge very lightly.
- Keep children and pets away: Do your sharpening when the kitchen is quiet.
- Wipe the blade carefully: Fold a towel over the spine and wipe away from the edge.
- Wear cut-resistant gloves if you want extra safety, especially when you are new to sharpening.
How to Keep Your Knives Sharp for Longer
Good habits can help your knives stay sharp longer, so you will not have to sharpen as often.
Use the right cutting board
Wood and plastic cutting boards are kind to your knife. Glass, stone, and ceramic boards are very hard and can dull your blade quickly. Avoid them.
Store your knives the right way
Do not toss your knives into a drawer with other tools. The blades will bang into each other and get dull or chipped. Instead, use a knife block, a magnetic strip, or blade guards.
Wash by hand
Wash the knife right after using it. Use warm water and a soft sponge. Then dry it with a towel.
Use the knife for its right job
Do not use your chef’s knife to pry open a can, cut through bones, or open a package. Use the tool made for the task. Chef’s knives are for chopping, slicing, and dicing.
Hone often
A few light strokes on a honing steel before you cook can keep the edge in good shape. It takes only seconds.
Do not cut on hard surfaces
Always use a cutting board. Cutting on a plate, a stone countertop, or a metal pan will damage the edge fast.
Should You Sharpen Knives Yourself or Hire a Pro?
For most home cooks, sharpening at home is enough. Once you learn how to sharpen kitchen knives, you will save time and money. It also feels good to bring a dull blade back to life.
But there are times when a pro is a good idea:
- Your knife has a big chip or a broken tip.
- You own very expensive or rare knives and are afraid to damage them.
- You have a ceramic knife or a special Japanese blade.
- Your knife is so dull that nothing seems to work.
Many kitchen stores and local sharpening shops offer low-cost services. It can be a good choice if you want a perfect edge but do not want to do the work yourself.
Which Sharpening Method Is Best for You?
Still not sure which way to go? Here is a quick guide.
- You are a total beginner and want it simple: Choose a pull-through sharpener.
- You want the sharpest edge and enjoy hands-on work: Choose a whetstone.
- You want speed and do not care for practice: Choose an electric sharpener.
- You just want to keep an already sharp knife in shape: Choose a honing steel.
- You have no tools right now: Try the mug trick for a short-term fix.
Many cooks use two or three of these tools together. A honing steel for everyday care, and a whetstone for deeper sharpening a few times a year, is a very popular setup.
Frequently Asked Questions About Sharpening Kitchen Knives
What is the easiest way to sharpen kitchen knives at home?
The easiest way is to use a pull-through sharpener or a tabletop sharpener. It is quick, cheap, and needs almost no skill. For better results and more control, learn to use a whetstone.
What angle is best for sharpening a kitchen knife?
For most smooth-edged kitchen knives, 15 to 20 degrees works well. Japanese knives often use about 15 degrees. Heavy knives may use 20 to 25 degrees.
Can I sharpen a knife with a honing steel?
A honing steel does not truly sharpen a knife. It straightens the edge. For a dull blade, you need a stone or a sharpener to remove metal and form a new edge.
How do I know if my knife is sharp enough?
Use the paper test. Slice through a sheet of paper. If it cuts cleanly with no tearing, the knife is sharp. You can also try the tomato test.
How long does it take to sharpen a knife?
With a pull-through or electric sharpener, it takes just a few minutes. With a whetstone, it can take 10 to 20 minutes per knife, especially when you are new.
Can I sharpen a serrated knife at home?
Yes. Use a tapered rod made for serrated blades and sharpen each tooth, one at a time. A regular stone or pull-through sharpener will not work well.
Can I sharpen ceramic knives?
Yes, but you need a diamond sharpener or a sharpener made for ceramic. A normal steel sharpener will not work. Many people send ceramic knives to a pro.
Is it bad to sharpen my knife too often?
Yes, a little. Each time you sharpen, you remove some metal. Over many years, too much sharpening can wear a knife down. Use a honing steel often and sharpen only when needed.
Do I need to soak my whetstone?
It depends on the stone. Many need a soak of 10 to 15 minutes. Others only need a splash of water, and some use oil. Always read the label.
Why does my knife get dull so fast?
Common reasons are cutting on hard boards, washing in the dishwasher, storing knives loose in a drawer, and using the knife for the wrong job. Fix these habits and your knives will stay sharp longer.
Can I use a knife sharpener on all my knives?
Not always. Check that your sharpener fits your knife type and angle. Serrated and ceramic knives often need special tools.
Final Thoughts
Now you know how to sharpen kitchen knives the simple way. You have learned the difference between honing and sharpening, how to test if a knife is dull, and how to pick the right angle. You have seen how to use a whetstone, a honing steel, a pull-through sharpener, an electric sharpener, and even a mug in a pinch. You also know how to care for serrated and ceramic knives and how to avoid common mistakes.
The most important thing to remember is to keep it simple. Start with a tool that feels comfortable. Keep a steady angle. Use light pressure. And do not rush. With a little practice, you will be able to bring any dull blade back to a smooth, clean edge.
Sharp knives make cooking safer, faster, and more enjoyable. They help you get the best from your food and your time in the kitchen. So pick out your dullest knife, grab your favorite sharpener, and give it a try today. Your tomatoes, onions, and fingers will thank you!
